Breaking Scenes Down
Okay so you have your scenes written out, now it’s time to really start building your script by breaking things down into pages and panels.
Again, I suggest you write your first draft freely. Let your story come out naturally at least once before you start a deep dive analysis on it.
That said, it seems that every story I write has at least one scene I just can’t seem to break down. I might have a general idea of what I want to have happen in the scene, but when I actually go to script it out, the words don’t come out right, or the panel structure is all wrong. If I’m really struggling to script out a scene, I use the following formula to help break the scene down into its components:
-
First, I split apart the individual actions of the scene
-
I then group those actions into pages
-
Finally, I use those now divided up actions to form panels
Each step has its own explicit purpose and by following them, I can create a solid, in depth script of each scene.
As I rearrange and rewrite scenes, I frequently jump back and forth between these three steps, so don’t feel like you have to complete each one fully before moving forward.
Splitting Scenes Into Atoms
The first thing I do when breaking down a scene is to take my notes and split them up into atoms.
So… what’s an atom?
Mastering Comics by Jessica Abel and Matt Madden has an excellent section on atoms that I encourage you to check out but in an attempt to summarize: atoms are the elementary actions of a scene.
Atoms are snapshots in time, consisting of a single action or state change. A dog lies down. Someone smiles. A gun fires. Atoms are just about the lowest level you can break a scene down into. Any time something moves from one state to another, no matter how small the change, it can be considered as an atomic action.
Here’s an example scene from an superhero comic that I wrote for us to play with:
Carson shoots a blast of fire from his hands at a car. In response, James shoots frost from his hands at the car to put out the fire. As the fire dissipates the car takes off. The driver of the car spots Faith standing in the road in front of him, blocking their way. The driver pulls out a gun, leans out the window, and shoots at Faith.
That scene broken into atoms might look like the following:
- Carson shoots a blast of fire from his hands at a car.
- James shoots frost from his hands at the car to put out the fire.
- The fire dissipates.
- The driver hits the gas pedal.
- The car takes off.
- The driver spots Faith in the road.
- The driver reaches into the glove box.
- The driver pulls out a gun from the glove box.
- The driver leans out the window.
- The driver shoots the gun at Faith.
Each of the above lines contains a single action.
There are a couple reasons to break out the atoms of a scene:
-
It’s a good way to determine the length of a scene. The more actions you have to show, the longer the scene will be. Pulling out the atoms also makes it much easier to split up the story into pages (see the next section).
-
It can help reveal which moments can be merged together and which ones must stand on their own. A woman opening a door and saying hello can be shown at the same time. A man unholstering a gun, firing it, then re-holstering it cannot. (Not easily at least.) Atoms that can occur at the same time are called parallelizable atoms. Combining such atoms is often a useful tool for condensing your story and making panels more interesting. (More on this in the “forming panels” section.)
The Minimum Set of Atoms
Now, you don’t need to show absolutely every atom in a scene. A guy picks up a cup. He takes a drink. He puts down the cup. He picks up the newspaper… You can imagine how showing every single atom can get extremely boring for the reader. (Another tool that can be used intentionally by the way!)
What’s important is that there’s a minimum set of atoms you have to show for a scene to be comprehensible. If you have one panel with two people greeting each other, and the next panel is one guy dead on the floor… you’ve missed an important atom in the middle explaining what just happened. Think of your minimum set as the fewest number of atoms needed for a reader to reasonably be able to fill the gaps in between each element. These are the points you MUST hit when paneling the scene.
Once you have that minimum set of atoms, you can add more atoms as needed to enhance the pacing and mood of the story. Action scenes are fast paced, and so are usually written with fewer supplementary/non-essential atoms to match the high speed of the moment. Intimate scenes are slow, and can afford to add some more, non-essential, atoms.
All that said, I found that a lot of this part of the process can be glossed over. It’s not really necessary to break absolutely everything down. It’s just helpful if you’re struggling with organizing a particular scene.
Grouping Atoms Into Pages
Once I have all my atoms, I start dividing them up into pages. Here are a few tips to determine the best places to split pages:
-
Avoid having too many or too few atoms in a page. Having too many atoms will result in cluttered pages. Too few will be a waste of space (unless an important action is taking place). This is more important when considering the actual panels of a page, but since panels are built up of atoms, it’s good to catch any potential problems early on.
-
Match the pacing of a page with the number of atoms you have. By adding lots of atoms/panels to a page, you can ramp up the pacing of that page. The more atoms/panels in a page, the less complex they have to be and so the faster the reader can get through them. For the reader this gives the illusion of a faster paced scene. This is why action pages in comics tend to have a high number of low complexity panels whereas slower paced pages opt for fewer, more detailed panels.
-
Every page should achieve something. In the previous section I mentioned that each scene should have a purpose. The same holds true for each page, just on a smaller scale. Whether it’s furthering the plot, revealing something about the characters, or simply reinforcing the tone, each page should feel like it has added something to your story.
-
Match page turns with natural pauses in dialogue and new scenes. It takes the reader time to turn the page. This interrupts the pacing of a scene, and is thus a good place to put quick breaks in your story. Avoid having jokes or conversations carry over through a page turn, and try not to change scenes mid page (it can be done, but it’s hard to get right).
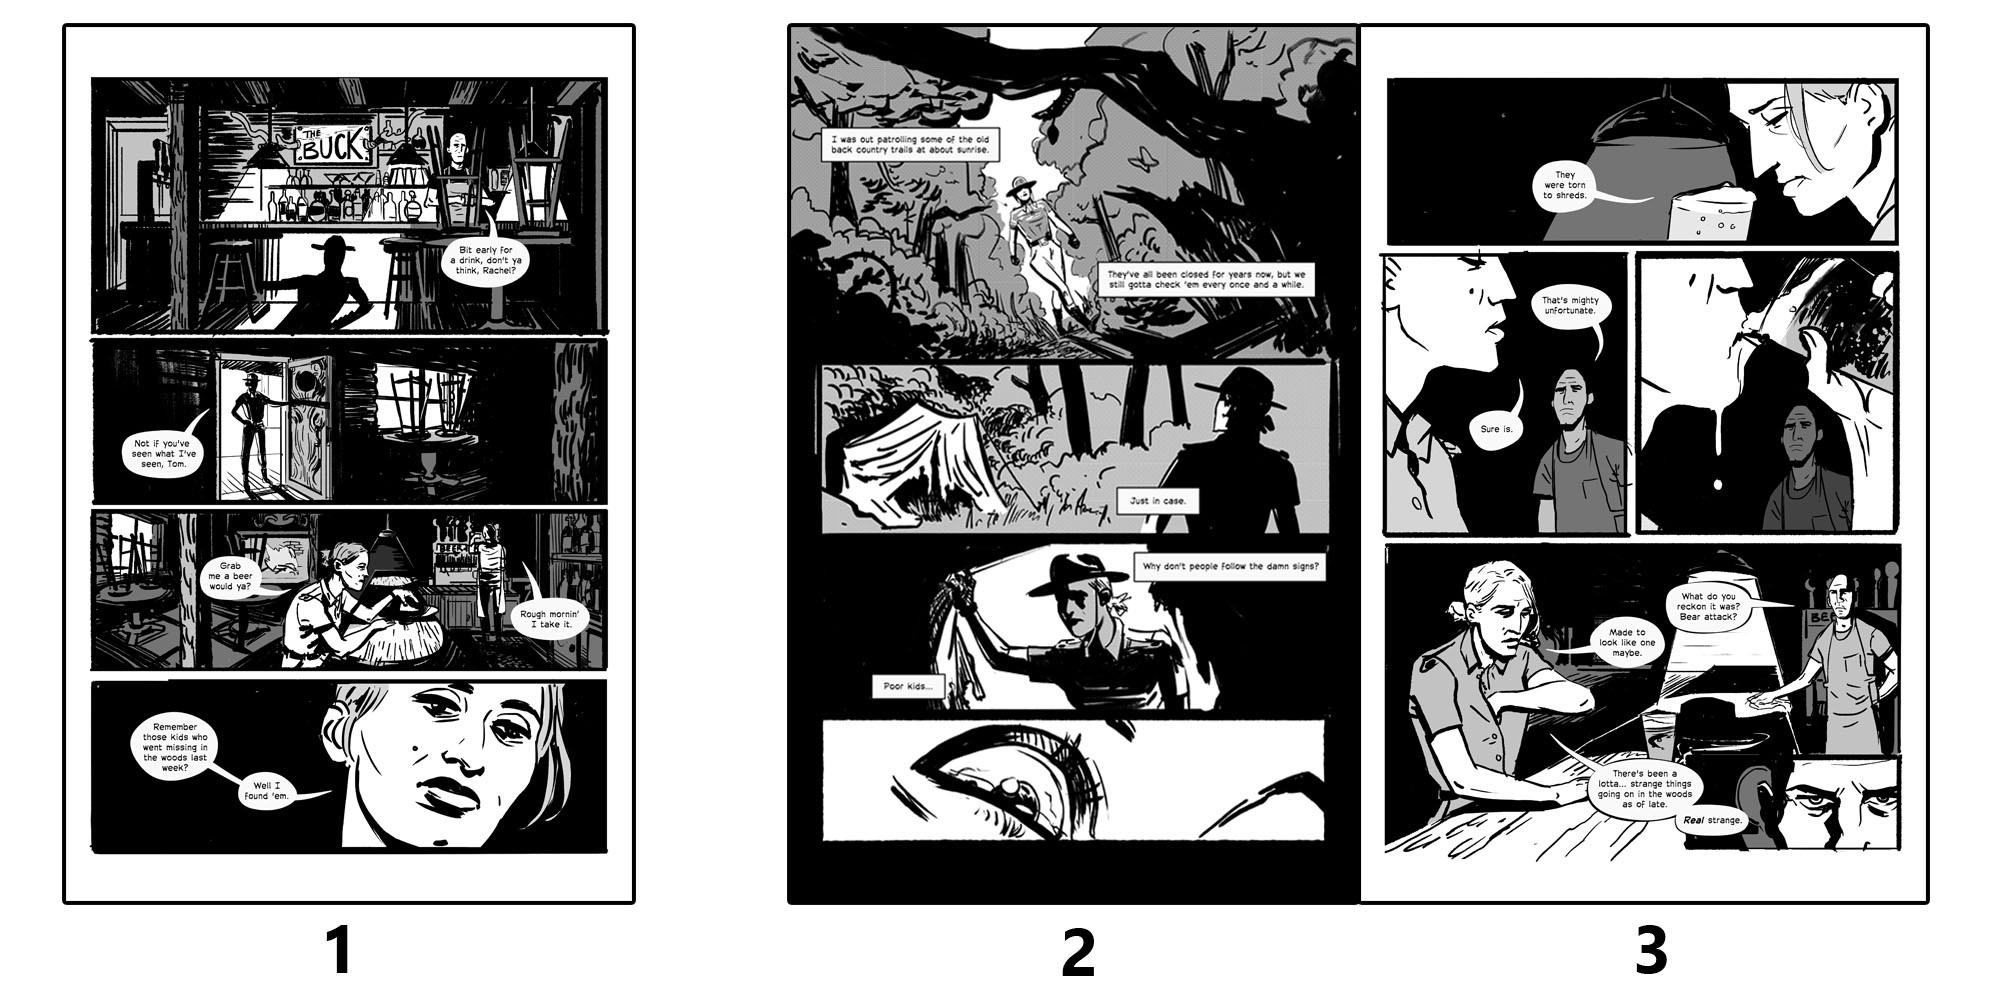 The Buck - Evan Waterman, Dillon Snook
Of course planning page turns requires knowing what pages will be followed by such turns. Comics usually put odd pages on the right side of the book since books tend to start with the first page on it’s own. From there, pages two and three are together, four and five together, and so on. This isn’t a requirement however. Just know which pages (odd or even) will be before page turns, and time your page breaks accordingly.
-
Similarly, hide reveals behind page turns. When readers see two pages together, they can’t help but glance forward at both pages, spoiling any secrets you may have in those pages. By placing reveals behind page turns, they will be more impactful for the reader.
-
As much as possible, end every page with a mystery that urges the reader to turn the page. As a writer, you want to be constantly pulling your reader through your story. By adding a hook at the end of your pages (which can be as simple as a leading line of dialogue), your reader will be more engaged and it will make for a smoother read. It doesn’t have to be a massive mystery, just something that makes us wonder what’s on the other side of the page. It’s also useful for helping one page flow to another. Obviously you won’t always be able to do this, so don’t stress too much if it doesn’t work in any particular situation.
Here’s the previous scene split into pages:
Page 1
- Carson shoots a blast of fire from his hands at a car.
- James shoots frost from his hands at the car to put out the fire.
- The fire dissipates.
- The driver hits the gas pedal.
- The car takes off.
Page 2
- The driver spots Faith in the road.
- The driver reaches into the glove box.
- The driver pulls out a gun from the glove box.
- The driver leans out the window.
- The driver shoots the gun at Faith.
Notice how the final atom acts as a sort of cliffhanger for each page. How will the heroes respond to the car escaping and where is it going? Does Faith get shot? These questions make us (hopefully) want to turn the page to find the answers.
At the same time though, each page feels like it achieves something. Carson shoots at the car, it drives away in response. The plot has progressed. Faith is standing in the road, the driver reacts by shooting at her. The tension grows.
Also notice how I divided the atoms here. I chose to split them up evenly, four per page. With that number, I can get a better idea about how everything is going to fit in the pages. Now, you don’t have to keep exactly the same number of atoms per page throughout your story, I just did so here because I wanted to maintain the same pacing across the two pages.
Forming Panels
Once I have my atoms and page breaks, I can finally begin to construct my panels.
First off, what even IS a panel?
Well, when you really break it down, a panel is simply a snapshot in time used to express a series of actions. To put it in familiar words: a panel is a collection of one or more atoms.
Sometimes a panel will contain many different atoms and sometimes a single atom will stretch across multiple panels. The number of atoms that can fit in any given panel really depends on how parallelizable those atoms are.
Parallelizable Atoms
This concept of “parallelizable atoms” is very important to grasp, so I pulled it into its own sub-section.
Two atoms can be said to be parallelizable if you can show them both happening together. Let’s simplify things a bit. I want you to imagine a person alone, in an empty room. The two atoms “the person smiles” and “the person opens the door” can be shown together. They’re parallelizable because it is physically possible to draw the person opening the door while smiling.
However the atoms “the person opens the door” and “the person closes the door” are not parallelizable. No matter how hard you try, it’s pretty much impossible to show both the opening and closing of a door in one drawing, at least in a readable way.
If two atoms are NOT parallelizable (and you need to show them both), it’s almost ALWAYS a good idea to split them up into different panels.
Unfortunately, things get a little more complicated when you add more characters to the mix.
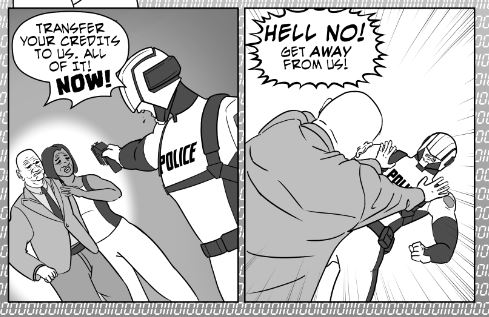
I said earlier that “a panel is a snapshot in time” but that’s not always true. In fact, panels can actually be used to show the progression of time. A series of snapshots can exist, all within the same panel.
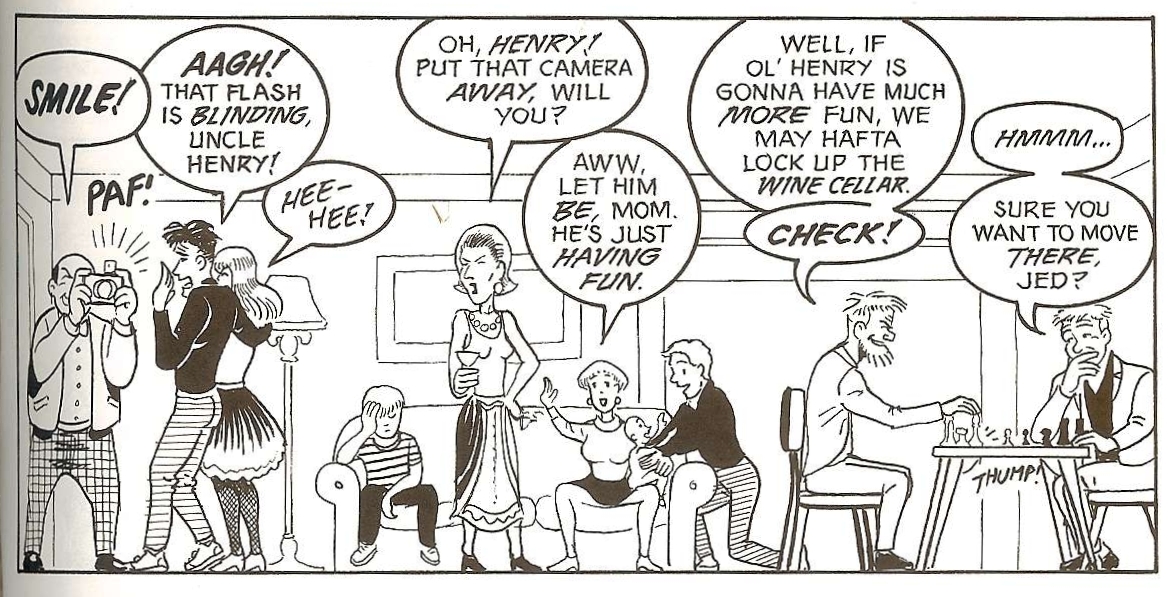 Understanding Comics - Scott McCloud
The above panel emphasizes this point perfectly.
As you read through the panel from left to right, time moves forward. The characters on the right side of the panel are at a later spot in time than those on the left. Here’s that same panel now split into different panels to make the time progression more obvious:
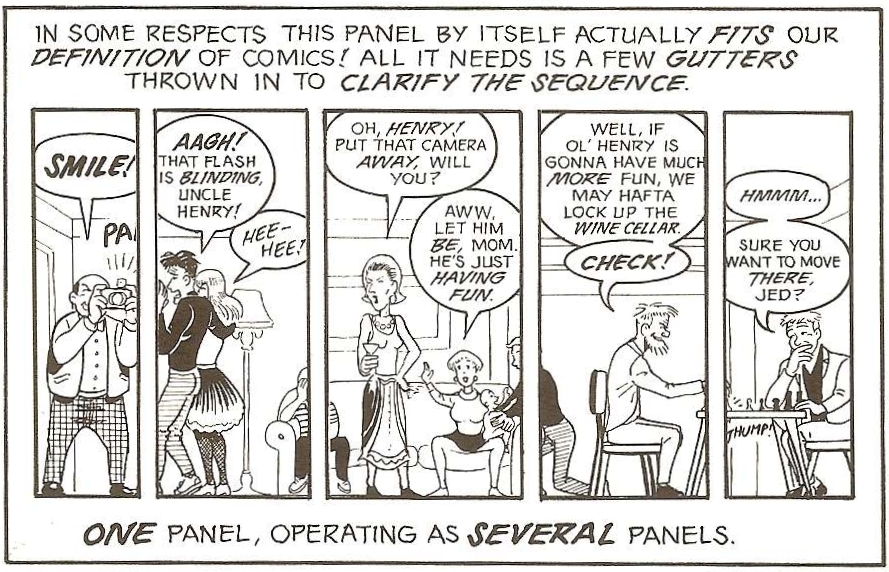 Understanding Comics - Scott McCloud
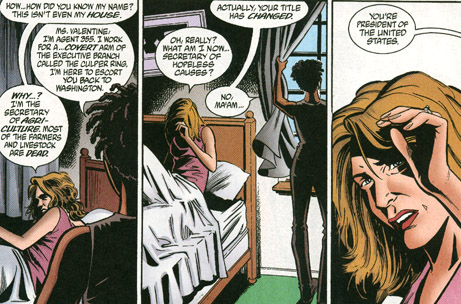
This effect can even be achieved in one panel with a single character:
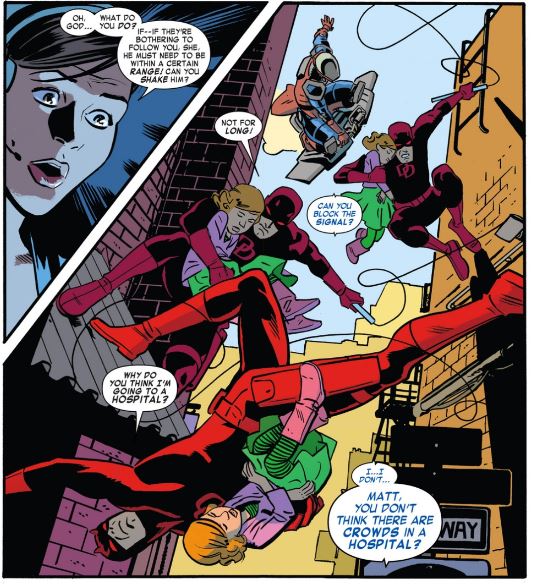 Daredevil - Mark Waid, Chris Samnee, Peter Krause
What really makes this effect work is the progression of the eye through the page. Just as people assume time is progressing forwards from one panel to the next, by constantly moving the reader forward within a panel, the reader will naturally assume time is moving forward as well.
This is why most writers stick to a single exchange per panel. Character one says something, character two responds. The eye moves forward, time moves forward. Sometimes that exchange is even stretched across multiple panels.
Including a full back and forth between two characters in a single panel can often mess with the natural flow of time because it forces the reader backwards in the panel. It can work if done right but it’s hard to pull off cleanly. Having more than one exchange in a panel usually only works if the counter-response is spoken in the same tone as the original statement and if that character’s expression wouldn’t have changed much since their original line.
 Y the Last Man - Brian K. Vaughan, Pia Guerra, Jose Marzan Jr.
All this is to say that deciding when to merge parallelizable atoms together is a tough decision to have to make. After all, just because you CAN shove two actions together in a single panel, doesn’t mean you should. The answer to which atoms should go together depends on a bunch of different factors and is more complex than a simple yes/no answer.
Which brings me to…
Merging Atoms Into Panels
Now that you have a better understanding of atoms and the progression of time within a panel, it’s time to start building those panels. For real this time!
My goal for this section (and remember I only get this granular when I’m struggling to break things down), is to take the atoms I have in a page, and convert them into panels.
Here are a few tips for how to do that:
- Isolate essential atoms in their own panel to heighten their impact. Check out this panel from Y the Last Man:
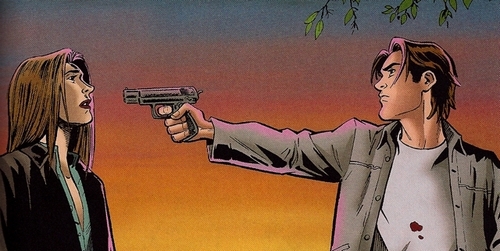 Y the Last Man - Brian K. Vaughan, Pia Guerra, Jose Marzan Jr.
There’s just one action: Yorick pointing the gun. No dialogue. No other characters. That’s what makes the moment so powerful. Some might even choose to stretch an atom like this across multiple panels.
-
The faster the pace of a scene, the fewer the atoms you want per panel. While adding more atoms/panels to a page speeds up the pacing of that page (because the individual panels within that page must become smaller and thus, simpler), the opposite is true for within a single panel. The more actions/atoms occurring in a panel, the more detailed that panel must be to show them all clearly. Because more details means more time required for the reader to absorb it all, more complex panels are often perceived by the reader as slower paced. This is great for quiet, intimate scenes, but less so for intense battle scenes. (Unless you’re trying to show scale or pause for a big crescendo.) If you want the panel to seem fast paced, it’s a good idea to try and simplify it into one or two atoms. By the way, that’s not to say that ALL single atom panels are fast paced. Just take a look at the above photo from Y the Last Man again. It’s a single atom but the moment is slowed way down. It’s almost frozen in time, like it could last forever.
-
Cut unnecessary atoms and panels. Every atom that doesn’t have a purpose would be a waste of space to include in or as a panel. Ask yourself what each atom achieves. Also ask yourself whether or not a previous atom already achieves that purpose. If you already have a panel showing your character is thirsty, do you really need that second one showing the same thing? Maybe you do, maybe you don’t. Either way, it’s worth thinking about. And remember that not every panel and atom needs to have a grandiose purpose. Your reasoning could be as simple as the panel helps to frame the scene for the reader, or reinforces the tone of the scene. Just make sure that, whatever it is, there‘s a reason behind each panel.
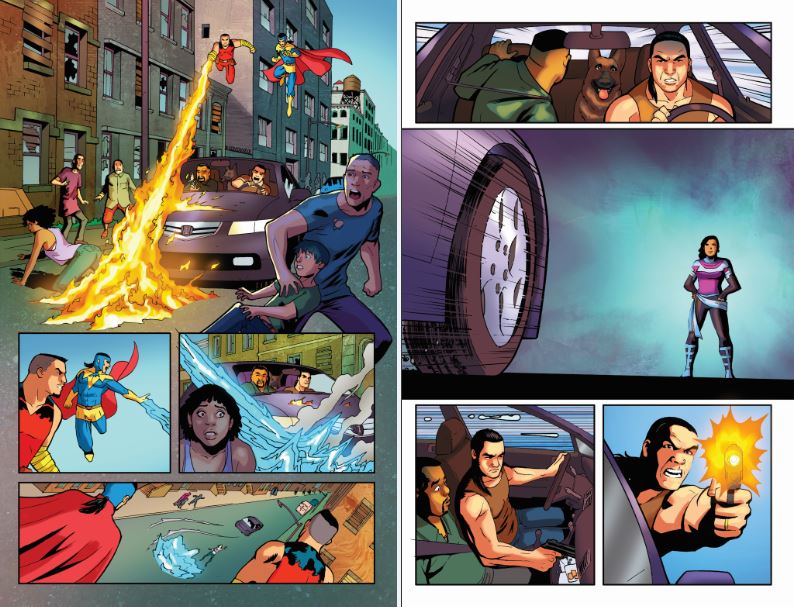
Here’s that scene from earlier with the atoms merged into panels:
- Panel 1.1
- Carson shoots a blast of fire from his hands at a car.
- Panel 1.2
- James shoots frost from his hands at the car to put out the fire.
- Panel 1.3
- The fire dissipates.
- Panel 1.4
- The driver hits the gas pedal.
- The car takes off.
- Panel 2.1 + 2.2
- The driver spots Faith in the road.
- Panel 2.3
- The driver reaches into the glove box.
- The driver pulls out a gun from the glove box.
- Panel 2.4
- The driver leans out the window.
- The driver shoots the gun at Faith.
And take a look at those panels fully drawn out (with dialogue removed):
Okay okay I get it. Now that I have my panels broken down, how do I formalize it for my artist?
It’s time to write a script!
Table of Contents
Intro
Before You Start
Writing
- Overview
- It All Starts With An Idea
- Thought Dumping
- Outlining
- World Building
- Characters
- Writing Scenes
- Breaking Scenes Down
- Scripts
- Dialogue
- Revision
- Choosing A Title
- Writer's Block
Hiring A Team
- Overview
- Sorting Out Your Budget
- Writing A Solicitation
- Where To Find Your Team
- What Makes A Good Partner
- Contracts
Drawing
Colouring
Lettering
- Overview
- General Tips
- Standard Black vs Rich Black
- Choosing A Font
- Font Types
- When To Bold Text
- Sound Effects
Marketing
Publishing
Printing
- Overview
- Getting Print Ready Files
- Offset vs Digital Printers
- Why Page Count Matters
- Book Formats And Binding Types
- How Many Copies To Print
- Aesthetics
- Tips For Saving Money
- Printer Comparison Table